
 Latest images
Obrada glave
YUGO FORUM :: Motor
Strana 1 od 1
![]()
25032010
 Obrada glave
GLAVA
*Restrikcija lezi u samom dizajnu glave.Kanal, prije svega mislim na usisni, ima mnogo krivina i okreta.Lakoca kojom motor usisava zrak pri datoj brzini motora(rpm) iskazuje koliki je "protok".
Veci protok znaci da ce se lakse proizvesti veca snaga.
Takodje,kanal(port) i sam ventil nisu dovoljno fizicki veliki da omoguce da se vishe zraka usisa.Kao i svugdje u motoru,posebno kod tjuninga, i ovdje postoje kompromisi.Generalno, veci kanal znaci da ce zrak sporije putovati kroz isti pri datoj brzini motora(rpm).Ovo je poznato kao "brzina kanala"(Port Velocity).Visoke brzine u kanala su dobre,jer ce se gorivo ljepo mjesati sa zrakom dok prolazi kroz karburator, a postoji i odredjena kolicina inertnog usisnog efekta, pri punjenu cilindra.
Kod Fiatovih motora bice visokih brzina u kanalima ali na niskim obrtajima.Ovo je zasluga uskih kanala, i odvratnih neravnina i izoblicenja koji ne dozvoljavaju kvalitetan protok.To znaci da ce spic obrtnog momenta biti na niskim obrtajima.Motor nece bit u mogucnosti da proizvede veliku snagu jer pri visokim obrtajima motor jednostavno ne moze da provuce dovoljno smjese kroz kanale dovoljno brzo.
Bas zbog svega toga prvi posao nam je da omogucimo motoru da pravilno udishe.Kada to zavrsimo ,motor ce ljepo reagovati ma promjene na izduvu,zamjenu i modifikacije karburatora kao i zamjenu bregast...
Prvo moramo skinuti glavu sa bloka.Ovo moze biti tesko jer se alu glava zna zaglaviti tj. zaljepiti za celicne serafe koji je drze.Totalno razliciti materijali tjeraju jedan drugog da korodiraju kada su u kontaktu.
Treba ce vam svrdla za busilicu.Postoje kameni i dijamantski.Od dijamantskih nema bolje ali im je i cjena malo jacha, tako da ce kameni sasvim ljepo posluziti.
Uklonite ventile pazeci da ih slozite i obiljezite nekako u pravom redu zabog kasnijeg vracanja.Krecemo sa radom na kanalima.
Prvo ublazite sve nagle krivine,neravnine i izbocine i praveci sve krivine postepenim.Mnogo metala moze da se "skine" radeci ovo posebnu u oblasti oko vodjica.Malo cemo "varati" i necemo sastrugati vodjice, pa ce biti malo tesko raditi u ovoj oblasti.Skidanje vodjica bi pomoglo puno.Ali nove vodjice bi trebalo upresti ponovo u glavu, moguce i nove ventile..Zelimo da zadrzimo ovaj posao u rangu DIY redukujuci troskove na minimum.Problem je sto su kanali za vodu jako blizu kanala, posebno na spoljnjoj krivini, za usis odnosno izduv.Mozete slobodno natopiti kamen za brusenje sa WD-40.Zaustavice kamen da brzo skida veliku kolicinu metala odjednom.Mozete da budete prilicno kreativni u ovom poslu samo ne mojte pretjerivati.
Sljedeci posao je da da povecamo kompresiju sa standardnih 9.2:1(u pitanju je 1.5motor) na nekih 10.5 .
Korist ove modifikacije je da ce usisani zrak biti vishe kompresovan, tako da ce se vishe sile osloboditi eksplozijom smjese u formi kineticke energije.Korsit ce se vidjeti tijekom cjelog obrtnog opsjega,praveci motor osjetvljivijim na ostale modifikacije.
Mana je u mogucem samozapaljenju smjese, iliti deotanciji ako se ode predaleko sa komprsijom.Detonacije ce ako se ne sprjece na vrjeme ubrzo unsititi vas motor.Dakle negdje oko 11:1 je stvarno MAKSIMUM koji je siguran da se koristi na motor za svaki dan.Cak i tad bi trebalo koristiti kvalitetno gorivo sa MINIMUM 97oktana.Negdje sam vidio da bi valjalo paljenje podesiti na 5stepeni prije GMT.
Kompresija(Commpresion Ratio) se racuna na sljedeci nacin:
CR=Zapremina Cilindra+zapremina komore za sagorjevanje/zapremina komore za sagorjevanje
*ZAPREMINA KOMORE ZA SAGORJEVANjE
Zapremina se mjeri u CC, kubnim centimetrima.Mjeri se tako sto:
Vrate se svjecice,stave ventili(naravno u zatvoren polozaj).Zatim uzmemo komad stakla(mjere da pokrije komoru) na kojima bi trebalo izbusiti minimum dvije rupice.Ivice komore namazite sa tovatnom mashcu.Postavite staklo i istiskujte zrak koji ce se vidjeti po ivicama komore kao mjehurcic u masti.Kada to zavrsite treba napuniti komore sa motornim ulje,vodom ili nekom drugom tecnoscu.Na ovaj nacin ce te provjeriti i kako dihtuju ventili.E sad, da biste napunili komore valjalo bi naci nekakvu pipetu, ali i malo veci shpric ce posluziti.Ne zaboravite da da biste izracunali kompresiju morate dodati i zapreminu udubljenja na klipovima,"supljine" izmedju cela klipa i prve karike, kao i zapreminu koju ce dodati dihtung.Za povecanje kompresije se koristi skidanje glave (ponekad i bloka).Ovo ne mozete raditi nazalost sami.Kao primjer za dizanje kompresije sa 9.2:1 na 10.8:1 je CENZURA skinuti 2mm sa glave.
Vrlo je bitno da na donjoj povrsini glave(koja dodiruje blok) nema strugotine i "oziljaka" jer ce prouzrokovati pregjevanje u komori i samozapaljenje smjese.
*USISNA GRANA
Sljedeci posao je da uparimo usisne kanale sa kanalima na usisnoj grani(port match).Ovo je malo dosadniji i da kazem za mozak komplikovaniji posao pa ima jedan laksi nacin koji i nije tolko losiji.usisnoj grani.Da napomenem,SAMO IZLAZE prosirite na tu mjeru.Zatim ga ljepo zaokruzite i stopite u usisni traktu u glavi.Nece praviti prevelike razlike u protoku i snazi u odnosu na onaj tezhi nacin koji zbog jasnog razloga(DIY) nisam htio da objashnjavam.
*KARBURATOR
Zadnje sto cemo za sad raditi, je da obradimo karburator.Za primjer cemo uzeti dvogrli karburator.Standardna modifikacija koja pravi veliku razliku u osjetvljivosti motora na gas je zamjena za jache dizne.Mi cemo ici malo dalje od toga.Sljedecu modifikaciju uradite samo na svoju odgovornost jer ce motor zbog nje dosta teze paliti.Uklanjamo cjeli sistem sauha.Ovo ce omoguciti veci protok pri WOT(WideOpenThrotle-potpuno otvoren leptir).Evo da razbijemo i jednu lau zabludu.Sve modifikacije na karburatoru ce stvarno znaciti nesto i osjetiti se samo pri WOT.
Sljedeca modifikacija je da povecamo glavno grlo sa 23mm na 26mm i sekundarno sa 26mm na 28mm.Ovo se radi tako sto se karburator rasklopi o donji dio odnese na masinsku obradu da se rabuse grla(postoje i kraburatori kod kojih se to moze mjenjati).28mm na drugom grlu je APSOLUTNI maksimum.Tamo gdje su grla uska(najuzha) treba postoji venturi izlaz.Zrak ce se tuda najbrze kretati omogucujuci dobru atomizaciju goriva dok izlazi da venturi.
P.S.Da napmenem da su modifikacije preuzete od "treceg lica" te nisam 100% siguran u prevod.Ako ima nekih greski javite.
Sada glava koja lakse dise moze da iskoristi sve dodatno modifikacije i provuce vishe zraka kroz karb i usisnu granu.Razlika cu vozac osjetiti na WOT i od srednjih do maksimalnih obrtaja,a ne na bas na niskim obrtajima i malim opterecenjima motora.
Ne zaboravite da biste ostvarili dovoljnu brzinu smjese kroz kanal treba motor vishe vrtjeti.
A sad par savjeta pri svom ovom poslu:
1)Kada obradjujete kanale, naspricajte WD-40 na zadnju stranu metala koji obradjujete jer kada se primaknete ivici i probijanju istog WD-40 ce poceti da isparava i pushi se.
2)Kada se povjecavaju grla pogorsava se protok kroz venturi.Da to rjesite mozete da zamjenite(kako to prosto zvuci jel da?! )) )za vece ali je to jako veliki posao i ne moze ni svaka masinska radionica da ga odradi.A i veci venturi zahtjeva vishe obrtaje da bi se dostigla tacka kada se dostize dovoljna atomizacija goriva.Nauk: ne pretjerujte sa grlima.
3)Bilo bi jako pametno da prjedjete na el. pumpu za gorivo a pomogucstvu sa podesvim regulatorom pritiska.
4)Valjalo bi i izbalansirati cjel "donji" paket ali je to vec malko veca investicija i uopste nije DIY.

vanja- Web master

- Broj poruka : 859
Datum upisa : 22.03.2010
![]()
![]()
Share this post on:
Obrada glave :: Komentari

![]() Ned Dec 05, 2010 7:18 pm od Gost
Ned Dec 05, 2010 7:18 pm od Gost
http://en.wikipedia.org/wiki/Cylinder_head_porting
DIY INTAKE MANIFOLD porting for Natural aspiration
So to begin first off you will need the required items.
Intake manifold gaskets.
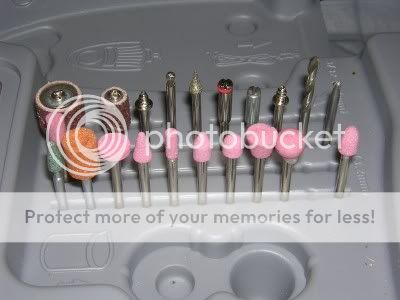
A dremel with up to 35000RPM variable speed adjustments and FLEX shaft.
At least a variety of 10 assortment different shape grinding stones.
Wire wheel assortment.
It's also nice to have a vacuum for clean out.
As well as a sanding assortment of 80grit sanders, and sand flaps 80,120,320grit(not shown in the pic).
Aluminum Oxide polishing abrasives 120grit, and 320 grit(not shown in the pic)
Always remember safety first and get some ANSI certified safety glasses aluminum shards can permanently damage your eye's.
Dust mask as well unless your the type that like aluminum poisoning of the blood, or early lung cancer.

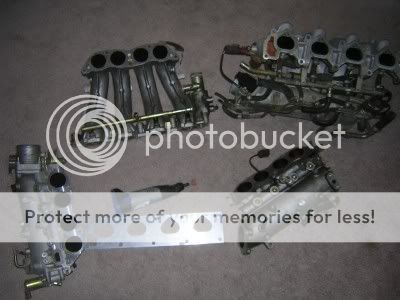
So to begin I didn't have the intake manifold gaskets available. They are special order, what I ordered were the standard felpro intake manifold gaskets. The gaskets cost $11.99. The reason why it isn't a big deal to have them at this moment is that an outline from the exhaust gasses already gave me a good traced circle of where I wanted to start and begin.
Now personally I don't clean the manifolds prior to porting. Reason being is that the dark exhaust gasses leave traced outlines of where I had or had not done the work needed. I must let people know in advance that porting is tricky, and very meticulous it isn't just something you get into and hack up, it does take finesse, so that when your work is finished you don't create divot's in the manifold that can interrupt intake flow.
Now I mentioned that all you need is a dremel with flex shaft. That is correct so don't mind my pics, I just like to have more than one tool readily available and the dremel does wear out do to it being cordless.
So to begin you need to take a tubular cylinder grinding bit out. You also need to treat the aluminum lightly. Use circular motion at all times when grinding out your ports. If you don't it can cause a divot. A comfortable speed to have the dremel at is at about 18,000RPM.


Now the whole idea isn't to make your porting to large. If the porting is larger than it should be then you decrease the velocity of air that you want to cram into the cylinder, so for that reason I still leave just a slight amount of the exhaust gas ring. In all, each port will only increase about 1mm in diameter. This way I don't lose any significant low end torque and I can get a little more pep in the mid range and high RPM's.
Now the tricky part is to extrude the runners. This means that you will need to use the flex shaft to move down the runner. I recommend using the same bit that we started with for the porting. When the shaft begins to get to much curvature you want to move to a much more rounded bit. I use one that I call the bullet, and the round grind.

Now this is a meticulous process just to do the lower half of the manifold each runner takes about 1hour to properly grind out the material and shaving. It is also important to remember the time it takes to grind out each runner as you can only extrude as much material within the amount of time it takes for each runner. That way keeping a time frame will leave each runner just about the same as the next.
As an end result of grinding one runner this is what you should come up with or somewhat similar. Remember the runner still hasn't been sanded so the edges still look rough.
BEFORE

AFTER


Now a completion of 2 hours spent. Completed the bottom half runner one. I'm noticing that I will need more grinding bits:

Checking some of my work. It appears that my eye's don't fail me. By the time I sand and polish, it will be 1mm on the bullseye.
Before

After

Finished grinding all of the lower runners today and began sanding down for polish. I am still waiting for a small shipment of the sanding flap wheels to come in. I have spent 4,1/2 hours on this project so far, and still no where near the completion I want it to be for proper design.
BEFORE
AFTER As you can see I've been getting messy, not good I will be cleaning this mess up.

Now until the sanders come in I have been starting to collect data on the upper runners. What is interesting is that the upper manifold runners are almost 2,1/4MM larger in diameter than the lower half plenum runners. Not to mention the casting is dog poo.
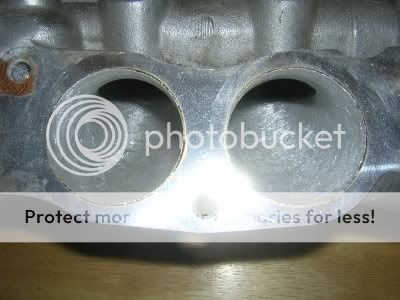
What this means from what I have gathered is that the lower plenum runners are made smaller for smog emissions. What this does is that it creates a temporary choke hold on inlet air as the EGR opens and allows the exhaust gas to bypass atmospheric air. The diameter size of the lower stock runners definitely shows signs that the manifold is anemic when in high RPM use, especially for 2.4litre displacement. BTW this will also affect the intake manifold pressure on forced inducted KA's.
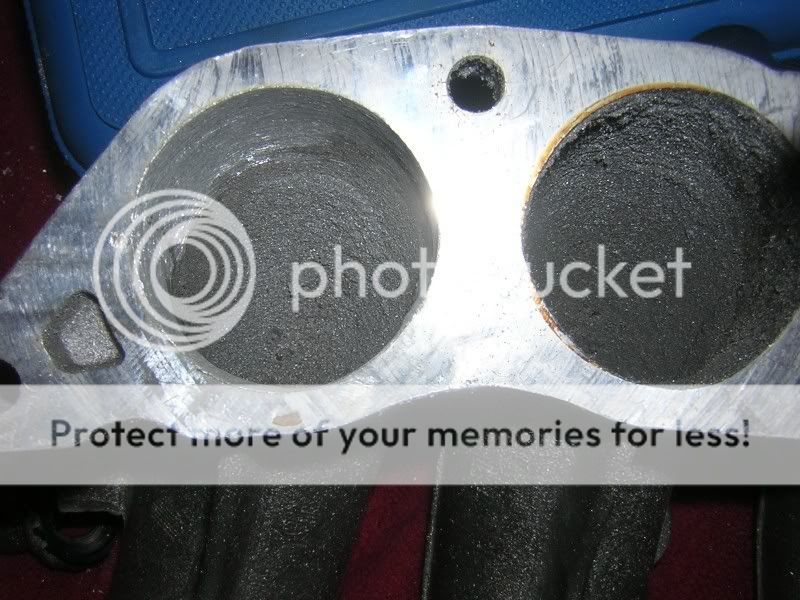
STOCK BOTTOM RUNNER DIAMETER
STOCK UPPER RUNNER DIAMETER

Now what I have started to pay close attention to is the casting of the upper runners. There isn't too much room for porting without decreasing the velocity. The manifold does need to be cleaned up though around the casting welds.
Finished up the polish on the lower runners. So far I have spent 6,1/2 hours.
I went through using 80grit and 120grit wheel flap sanders. Then I used the 120 grit, and 320grit polishing wheels It seems that manufacturers don't carry many 400grit applications anymore for that fine finishing touch. Overall the work looks great and each runner is now at 45mm, rather than the stock 44mm. As you can see manifold porting and honing is a dieing art as it takes many hours to perfect what you want. The runners feel baby butt smooth inside. I could of polished more for an ultimate shine but then I wouldn't really be making anymore HP.
I've been asked; "Why do you care to polish the inside of the manifold isn't it suppose to be rough?"
Theres a big misconception here, there are 2 different types of manifold designs old school design (using carburation) uses what is known as a wet manifold design. For wet manifolds they are suppose to be rough in order to atomize the Air to fuel more efficiently and effectively. Dry manifolds inject fuel at the opening of the head or in the case of direct injection is injected directly into the chamber. Dry manifolds are much more effective in making power when they are smoothed out or polished.

Well then maybe someone doesn't understand porting. As you can see I've kept velocity (by doing a slight increase, 1MM isn't much at all) which is a key factor in optimizing torque. It is true that if the runners are to large they can in fact lose torque if the runners are increased by to much DIAMETER. The smoothness of the runners on a intake runner, don't effect torque if the runners are to proper diameter.
O.K I have a bit of a delay on my felpro gaskets it appears that someone in shipping screwed up so it won't be in until Monday or Tuesday of next week. No worries though I decided to move onto the injector bosses. They needed a lot of cleaning up.
Now I know some people like to remove the BOSSES, I definitely won't be doing that for natural aspiration. The Bosses have included in them a velocity tunnel that that allows for atomization to occur, the velocity charge through the boss allows for the Air and fuel to mix upon delivery. The only time I would think on removing the boss is if I went forced inducted, but that isn't the case here. So first I had to pick my point's. I used a tiny screw driver to show you the selected point of removal.

Now as you can see this part is extremely delicate when extruding the aluminum. In fact it is so delicate I have decreased the speed on the dremel to 10,000~13,000RPM, and I am taking my time.
In the processes I have increased the diameter of the injector boss, as well as smoothing out the contour around the injector boss, this will help to increase the velocity through the runner.
BEFORE
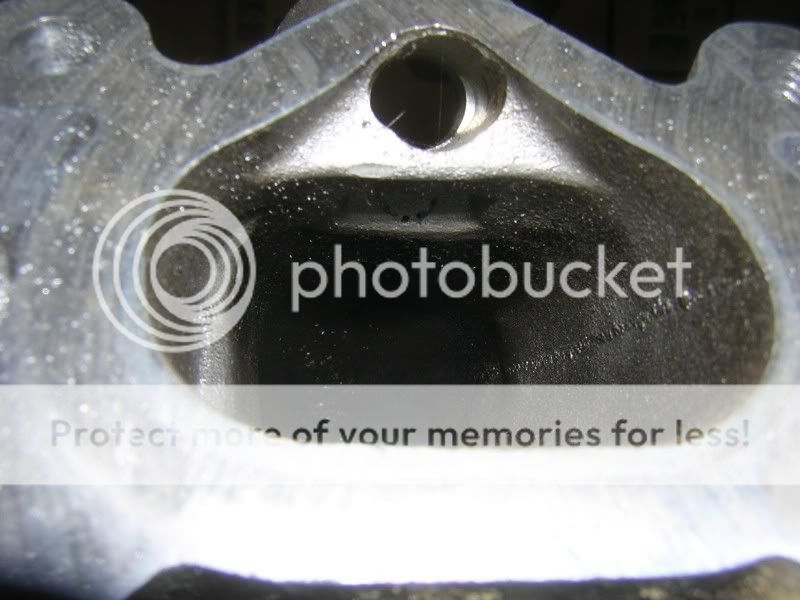
AFTER
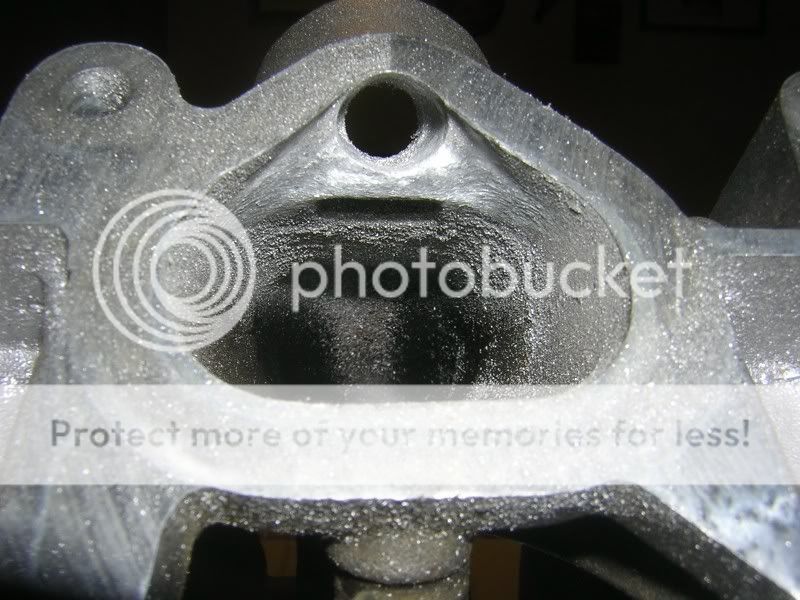
I found that the best grinder to use for this process is the bullet shaped grinder, it is best to stay away from the cylinder grinder unless I am working deep enough into the runners. Still this looks rough , but once the sand and polish is applied it will look better. Completion of one injector boss takes roughly an hour.
The best way to work on the bosses is to turn the manifold upside down.

Today I almost completed everything with the bosses. I have not polished yet and that won't be done until every imperfection in the runners are corrected.
I used the bullet grinder and the 80grit wheel flap. After 3,1/2 hours my hands are shaking. As a reminder when you do the bosses even the flap wheel needs to run at 10,000 to 13,000 RPM as well, the sander can do as much damage to the aluminum as the grinder can. You must have both hands on the grinder at all times or it can run off the grinding path and do damage to the port, or the bosses. Please be carefull if you chose to do work around the bosses.
Here is the completion of the bosses. You probably noticed that I haven't taken the vacuum lines off yet. That really doesn't matter to me and everything will be getting stripped down for cleaning eventually

BEFORE
MIDDLE STAGE
AFTER 80grit

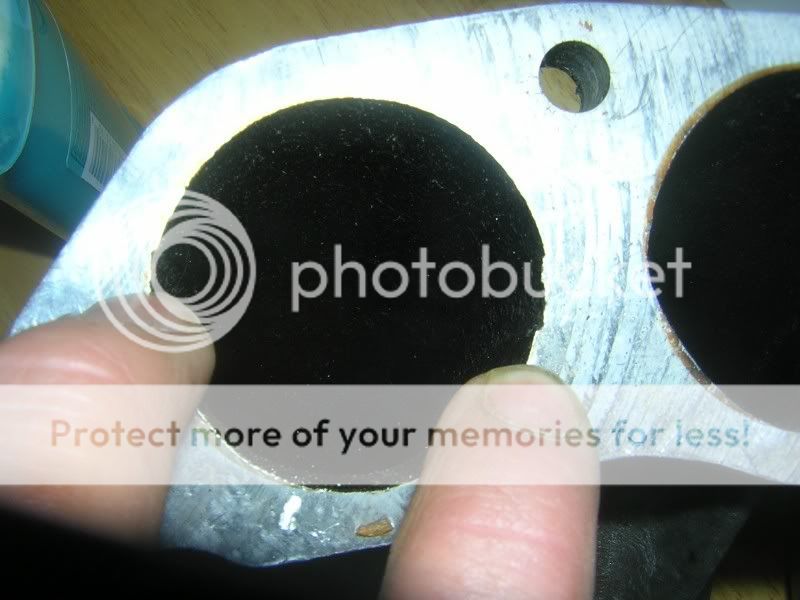
Gaskets still aren't in so now I am going to be moving into the runner to correct some SERIOUScasting imperfections. One casting imperfection sticks out like a sore thumb at almost 1.5mm as shown in this pic.

Something in the casting process didn't line up right, or the aluminum shrank to quick, it could also be one of NISSANS purposely engineered designs. In any case it has to go. This imperfection was noticed in runner 1, and runner 3, it definitely shows that some cylinders weren't making as much power as others as this cuts down on flow. These 2 cylinders could of experienced a 1 to 2 HP loss with an imperfection like this. This is one of the reasons why not even 2 of the same engineered engines will ever make the same HP on the dyno..
The second set of imperfections I wil be correcting is the lumps in each runner found right by the vacuum line.

Today I plotted out the manifold ports to the upper runners. Because the ports are not perfectly round I needed to plot some points to establish how well these ports will flow when compared to the porting I did to the lower runners.
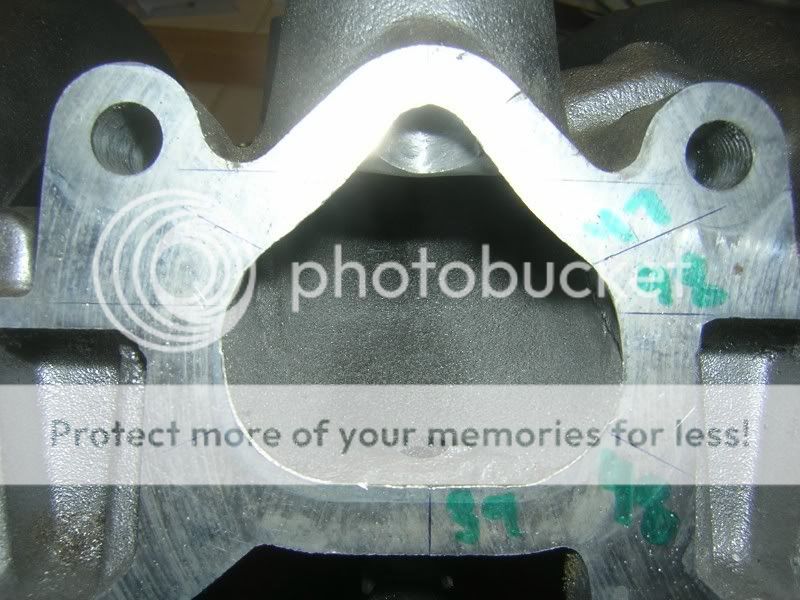
As you can see it's all averaging. Select 4 points that are the furthest points from each other. Add that total and divide by 4. This determines what points you select to grind and make even. It will work to keep accurate flow numbers.
This is the numbers that I came up with.
39MM+47MM+48MM+47.5MM/4=45.3MM Diameter/Flow
39MM+47.5MM+48MM+48MM/4=45.6 MM Diameter/Flow
39MM+47MM+48MM+48MM/4=45.5MM Diameter/Flow
39MM+47MM+47MM+48MM/4=45.25MM Diameter/Flow
I'll try to make them all at 45.6MM. That way they are equal, and the added fluid mass of fuel can mix air. As you can see not much work will be done. The area's that will be selected can be found in the plotted points.
Started on one of the imperfections today and I am still not done extruding the aluminum from it. I was only able to put 1 hour of progress in today. The imperfection runs almost a total of 80MM into the runner so I am extruding quite a bit of the aluminum from the wall of the runner.
BEFORE
[img][/img]
AFTER


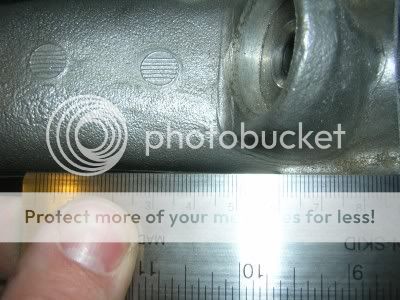
Here is a pic of how bad the imperfection is. You can actually see it from the exterior of the manifold. This is in fact a really bad casting imperfection ranging from 1.5~2MM in depth. I used a ruler as my straight edge so you can see the imperfection pay no attention to the ruler markings in this pic.

The imperfection runs almost 80MM into the runner.
Spent an additional 1,1/2 hours extruding the imperfections from the runner. Now I am on the way to working my way down the runner, only to clean up the seems on the casting before I go over it with 120grit wheel flap, and the polishing abrasives. This is basically just the rough work completed to the worst runner which had the wall come in almost 2mm.
BEFORE
AFTER

So far I have gone through 2 cylinder grinders 1 80grit flap wheel. I will also need to order more polishing abrasives in the 120 and 320 grits as well
So here is an update on the progress. Total time spent on the ports was3,1/2 hours of grinding and extruding material with the cylinder grinding stone.
The manifold is a little over 2/3 towards completion about this time.
All ports have been matched to to react like a 45.6MM opening. As you all know I won't bee port matching to the head until a rebuild so this is as good as this port process becomes, I still need to sand and polish.
BEFORE
RUNNERS 1 & 2

RUNNERS 3 & 4

I have just gotten back from my camping trip so I will be ordering the felpro gaskets today.
Also after looking at several KA24de manifolds, what I thought were casting imperfections in runner 1 and runner 3 are actually engineered casting. Why Nissan would do this I don't know, but my work looks great and is coming along well, each runner is to equal diameter to the head.
Today I decided to work on the coolant passage for about an hour. There were a few things that bothered me about the coolant passage. There are humps with in the coolant passage that prevents good flow. This bothers me because the coolant pump has to work harder to pull coolant through the passage. Not that I think I will gain any thing from this, but I am rather doing it for peace of mind.
BEFORE

AFTER

BEFORE

AFTER

I still haven't taken the time to order the gaskets.
I was considering on purchasing a PX3 gasket, but no one to date has proven that it has done anything.
So today I decided to start taking the casting imperfections out of the runners where the upper and lower manifold join together. The difficult part was that looking at this imperfection long enough I would have to extrude to the diameter of the gasket to make it round and smooth.

Here is what the runner looks like when it comes close to completion, I have spent about an hour on it with the cylinder grinder.
BEFORE
AFTER

Spent another hour today polishing up runner 4 with the 80 and 120 grit sanding wheels. I was just a little disappointed because the runner had some casting divots and imperfections in it next to the port. You will notice them on the bottom right of the runner. I don't want to extrude any more metal, so it is what it is, I can't complain, although I want too.

J/K I hate divots and it had to go!!!!!


Completed runner 3 and it looks amazing. I can't wait to see the difference that it made extruding all the aluminum, and polishing it...
BEFORE
Middle Stage
AFTER


As you can see from the PIC that the runners are off center when matched up with the gaskets, I did what I could to keep a perfect circle.

Now I am on to the last 2 runners.
Sorry guy's it has been awhile.
Finally dynoed the engine with 95 octane, and stock (20btdc) timing. The results are very impressive.
Can't wait till the PDM cams, and my ported intake runners go into place.
All most finished with the runners. Please keep in mind this was done on a mustang dyno, a dyno jet would of showed higher gains, not to mention I didn't advance timing is stock!!!
Shooting for 185RWHP when the manifold, and cams are installed.

Ovo je tutorial koji vazi za sve atmo motore...naravno glave se razlikuju,ali princip je isti.
Bilo bi lepo,ako neko zna za nase motore koje bi najbolje dimenzije kanala i ventila bile za gradsku zujalicu,koje za kombinovanu masinu (vikend trkac),a koje za trkacku masinu. Bregasta i karburatori su stvar izbora,o tome je vec pisano.
DIY INTAKE MANIFOLD porting for Natural aspiration
So to begin first off you will need the required items.
Intake manifold gaskets.
A dremel with up to 35000RPM variable speed adjustments and FLEX shaft.
At least a variety of 10 assortment different shape grinding stones.
Wire wheel assortment.
It's also nice to have a vacuum for clean out.
As well as a sanding assortment of 80grit sanders, and sand flaps 80,120,320grit(not shown in the pic).
Aluminum Oxide polishing abrasives 120grit, and 320 grit(not shown in the pic)
Always remember safety first and get some ANSI certified safety glasses aluminum shards can permanently damage your eye's.
Dust mask as well unless your the type that like aluminum poisoning of the blood, or early lung cancer.
So to begin I didn't have the intake manifold gaskets available. They are special order, what I ordered were the standard felpro intake manifold gaskets. The gaskets cost $11.99. The reason why it isn't a big deal to have them at this moment is that an outline from the exhaust gasses already gave me a good traced circle of where I wanted to start and begin.
Now personally I don't clean the manifolds prior to porting. Reason being is that the dark exhaust gasses leave traced outlines of where I had or had not done the work needed. I must let people know in advance that porting is tricky, and very meticulous it isn't just something you get into and hack up, it does take finesse, so that when your work is finished you don't create divot's in the manifold that can interrupt intake flow.
Now I mentioned that all you need is a dremel with flex shaft. That is correct so don't mind my pics, I just like to have more than one tool readily available and the dremel does wear out do to it being cordless.
So to begin you need to take a tubular cylinder grinding bit out. You also need to treat the aluminum lightly. Use circular motion at all times when grinding out your ports. If you don't it can cause a divot. A comfortable speed to have the dremel at is at about 18,000RPM.
Now the whole idea isn't to make your porting to large. If the porting is larger than it should be then you decrease the velocity of air that you want to cram into the cylinder, so for that reason I still leave just a slight amount of the exhaust gas ring. In all, each port will only increase about 1mm in diameter. This way I don't lose any significant low end torque and I can get a little more pep in the mid range and high RPM's.
Now the tricky part is to extrude the runners. This means that you will need to use the flex shaft to move down the runner. I recommend using the same bit that we started with for the porting. When the shaft begins to get to much curvature you want to move to a much more rounded bit. I use one that I call the bullet, and the round grind.
Now this is a meticulous process just to do the lower half of the manifold each runner takes about 1hour to properly grind out the material and shaving. It is also important to remember the time it takes to grind out each runner as you can only extrude as much material within the amount of time it takes for each runner. That way keeping a time frame will leave each runner just about the same as the next.
As an end result of grinding one runner this is what you should come up with or somewhat similar. Remember the runner still hasn't been sanded so the edges still look rough.
BEFORE
AFTER
Now a completion of 2 hours spent. Completed the bottom half runner one. I'm noticing that I will need more grinding bits:
Checking some of my work. It appears that my eye's don't fail me. By the time I sand and polish, it will be 1mm on the bullseye.
Before
After
Finished grinding all of the lower runners today and began sanding down for polish. I am still waiting for a small shipment of the sanding flap wheels to come in. I have spent 4,1/2 hours on this project so far, and still no where near the completion I want it to be for proper design.
BEFORE
AFTER As you can see I've been getting messy, not good I will be cleaning this mess up.
Now until the sanders come in I have been starting to collect data on the upper runners. What is interesting is that the upper manifold runners are almost 2,1/4MM larger in diameter than the lower half plenum runners. Not to mention the casting is dog poo.
What this means from what I have gathered is that the lower plenum runners are made smaller for smog emissions. What this does is that it creates a temporary choke hold on inlet air as the EGR opens and allows the exhaust gas to bypass atmospheric air. The diameter size of the lower stock runners definitely shows signs that the manifold is anemic when in high RPM use, especially for 2.4litre displacement. BTW this will also affect the intake manifold pressure on forced inducted KA's.
STOCK BOTTOM RUNNER DIAMETER
STOCK UPPER RUNNER DIAMETER
Now what I have started to pay close attention to is the casting of the upper runners. There isn't too much room for porting without decreasing the velocity. The manifold does need to be cleaned up though around the casting welds.
Finished up the polish on the lower runners. So far I have spent 6,1/2 hours.
I went through using 80grit and 120grit wheel flap sanders. Then I used the 120 grit, and 320grit polishing wheels It seems that manufacturers don't carry many 400grit applications anymore for that fine finishing touch. Overall the work looks great and each runner is now at 45mm, rather than the stock 44mm. As you can see manifold porting and honing is a dieing art as it takes many hours to perfect what you want. The runners feel baby butt smooth inside. I could of polished more for an ultimate shine but then I wouldn't really be making anymore HP.
I've been asked; "Why do you care to polish the inside of the manifold isn't it suppose to be rough?"
Theres a big misconception here, there are 2 different types of manifold designs old school design (using carburation) uses what is known as a wet manifold design. For wet manifolds they are suppose to be rough in order to atomize the Air to fuel more efficiently and effectively. Dry manifolds inject fuel at the opening of the head or in the case of direct injection is injected directly into the chamber. Dry manifolds are much more effective in making power when they are smoothed out or polished.
Well then maybe someone doesn't understand porting. As you can see I've kept velocity (by doing a slight increase, 1MM isn't much at all) which is a key factor in optimizing torque. It is true that if the runners are to large they can in fact lose torque if the runners are increased by to much DIAMETER. The smoothness of the runners on a intake runner, don't effect torque if the runners are to proper diameter.
O.K I have a bit of a delay on my felpro gaskets it appears that someone in shipping screwed up so it won't be in until Monday or Tuesday of next week. No worries though I decided to move onto the injector bosses. They needed a lot of cleaning up.
Now I know some people like to remove the BOSSES, I definitely won't be doing that for natural aspiration. The Bosses have included in them a velocity tunnel that that allows for atomization to occur, the velocity charge through the boss allows for the Air and fuel to mix upon delivery. The only time I would think on removing the boss is if I went forced inducted, but that isn't the case here. So first I had to pick my point's. I used a tiny screw driver to show you the selected point of removal.
Now as you can see this part is extremely delicate when extruding the aluminum. In fact it is so delicate I have decreased the speed on the dremel to 10,000~13,000RPM, and I am taking my time.
In the processes I have increased the diameter of the injector boss, as well as smoothing out the contour around the injector boss, this will help to increase the velocity through the runner.
BEFORE
AFTER
I found that the best grinder to use for this process is the bullet shaped grinder, it is best to stay away from the cylinder grinder unless I am working deep enough into the runners. Still this looks rough , but once the sand and polish is applied it will look better. Completion of one injector boss takes roughly an hour.
The best way to work on the bosses is to turn the manifold upside down.
Today I almost completed everything with the bosses. I have not polished yet and that won't be done until every imperfection in the runners are corrected.
I used the bullet grinder and the 80grit wheel flap. After 3,1/2 hours my hands are shaking. As a reminder when you do the bosses even the flap wheel needs to run at 10,000 to 13,000 RPM as well, the sander can do as much damage to the aluminum as the grinder can. You must have both hands on the grinder at all times or it can run off the grinding path and do damage to the port, or the bosses. Please be carefull if you chose to do work around the bosses.
Here is the completion of the bosses. You probably noticed that I haven't taken the vacuum lines off yet. That really doesn't matter to me and everything will be getting stripped down for cleaning eventually
BEFORE
MIDDLE STAGE
AFTER 80grit
Gaskets still aren't in so now I am going to be moving into the runner to correct some SERIOUScasting imperfections. One casting imperfection sticks out like a sore thumb at almost 1.5mm as shown in this pic.
Something in the casting process didn't line up right, or the aluminum shrank to quick, it could also be one of NISSANS purposely engineered designs. In any case it has to go. This imperfection was noticed in runner 1, and runner 3, it definitely shows that some cylinders weren't making as much power as others as this cuts down on flow. These 2 cylinders could of experienced a 1 to 2 HP loss with an imperfection like this. This is one of the reasons why not even 2 of the same engineered engines will ever make the same HP on the dyno..
The second set of imperfections I wil be correcting is the lumps in each runner found right by the vacuum line.
Today I plotted out the manifold ports to the upper runners. Because the ports are not perfectly round I needed to plot some points to establish how well these ports will flow when compared to the porting I did to the lower runners.
As you can see it's all averaging. Select 4 points that are the furthest points from each other. Add that total and divide by 4. This determines what points you select to grind and make even. It will work to keep accurate flow numbers.
This is the numbers that I came up with.
39MM+47MM+48MM+47.5MM/4=45.3MM Diameter/Flow
39MM+47.5MM+48MM+48MM/4=45.6 MM Diameter/Flow
39MM+47MM+48MM+48MM/4=45.5MM Diameter/Flow
39MM+47MM+47MM+48MM/4=45.25MM Diameter/Flow
I'll try to make them all at 45.6MM. That way they are equal, and the added fluid mass of fuel can mix air. As you can see not much work will be done. The area's that will be selected can be found in the plotted points.
Started on one of the imperfections today and I am still not done extruding the aluminum from it. I was only able to put 1 hour of progress in today. The imperfection runs almost a total of 80MM into the runner so I am extruding quite a bit of the aluminum from the wall of the runner.
BEFORE
[img][/img]AFTER
Here is a pic of how bad the imperfection is. You can actually see it from the exterior of the manifold. This is in fact a really bad casting imperfection ranging from 1.5~2MM in depth. I used a ruler as my straight edge so you can see the imperfection pay no attention to the ruler markings in this pic.
The imperfection runs almost 80MM into the runner.
Spent an additional 1,1/2 hours extruding the imperfections from the runner. Now I am on the way to working my way down the runner, only to clean up the seems on the casting before I go over it with 120grit wheel flap, and the polishing abrasives. This is basically just the rough work completed to the worst runner which had the wall come in almost 2mm.
BEFORE
AFTER
So far I have gone through 2 cylinder grinders 1 80grit flap wheel. I will also need to order more polishing abrasives in the 120 and 320 grits as well
So here is an update on the progress. Total time spent on the ports was3,1/2 hours of grinding and extruding material with the cylinder grinding stone.
The manifold is a little over 2/3 towards completion about this time.
All ports have been matched to to react like a 45.6MM opening. As you all know I won't bee port matching to the head until a rebuild so this is as good as this port process becomes, I still need to sand and polish.
BEFORE
RUNNERS 1 & 2
RUNNERS 3 & 4
I have just gotten back from my camping trip so I will be ordering the felpro gaskets today.
Also after looking at several KA24de manifolds, what I thought were casting imperfections in runner 1 and runner 3 are actually engineered casting. Why Nissan would do this I don't know, but my work looks great and is coming along well, each runner is to equal diameter to the head.
Today I decided to work on the coolant passage for about an hour. There were a few things that bothered me about the coolant passage. There are humps with in the coolant passage that prevents good flow. This bothers me because the coolant pump has to work harder to pull coolant through the passage. Not that I think I will gain any thing from this, but I am rather doing it for peace of mind.
BEFORE
AFTER
BEFORE
AFTER
I still haven't taken the time to order the gaskets.
I was considering on purchasing a PX3 gasket, but no one to date has proven that it has done anything.
So today I decided to start taking the casting imperfections out of the runners where the upper and lower manifold join together. The difficult part was that looking at this imperfection long enough I would have to extrude to the diameter of the gasket to make it round and smooth.
Here is what the runner looks like when it comes close to completion, I have spent about an hour on it with the cylinder grinder.
BEFORE
AFTER
Spent another hour today polishing up runner 4 with the 80 and 120 grit sanding wheels. I was just a little disappointed because the runner had some casting divots and imperfections in it next to the port. You will notice them on the bottom right of the runner. I don't want to extrude any more metal, so it is what it is, I can't complain, although I want too.
J/K I hate divots and it had to go!!!!!
Completed runner 3 and it looks amazing. I can't wait to see the difference that it made extruding all the aluminum, and polishing it...
BEFORE
Middle Stage
AFTER
As you can see from the PIC that the runners are off center when matched up with the gaskets, I did what I could to keep a perfect circle.
Now I am on to the last 2 runners.
Sorry guy's it has been awhile.
Finally dynoed the engine with 95 octane, and stock (20btdc) timing. The results are very impressive.
Can't wait till the PDM cams, and my ported intake runners go into place.
All most finished with the runners. Please keep in mind this was done on a mustang dyno, a dyno jet would of showed higher gains, not to mention I didn't advance timing is stock!!!
Shooting for 185RWHP when the manifold, and cams are installed.
Ovo je tutorial koji vazi za sve atmo motore...naravno glave se razlikuju,ali princip je isti.
Bilo bi lepo,ako neko zna za nase motore koje bi najbolje dimenzije kanala i ventila bile za gradsku zujalicu,koje za kombinovanu masinu (vikend trkac),a koje za trkacku masinu. Bregasta i karburatori su stvar izbora,o tome je vec pisano.
![]()
![]()


![]() Ned Dec 05, 2010 11:03 pm od Gost
Ned Dec 05, 2010 11:03 pm od Gost
jos sto cu ja ovo kod mene da radim............samo da ga reg.......
![]()
![]()
![]() Ned Dec 05, 2010 11:15 pm od Gost
Ned Dec 05, 2010 11:15 pm od Gost
Cekaj prvo da kupimo glavu od 1.1 neku za male pare pa onda 
![]()
![]()

![]() Sre Dec 08, 2010 1:07 pm od Mare 55AX
Sre Dec 08, 2010 1:07 pm od Mare 55AX
Kopa se u proleće, koliko se ja u poljoprivredu razumem  Pa svakom po motika u šaku...
![]()
![]()

![]() Sre Dec 08, 2010 11:56 pm od stevdzan
Sre Dec 08, 2010 11:56 pm od stevdzan
more vas dva ste mi mnogo pametni,znate vi o cemu se tu zapravo radi
![]()
![]()
![]()
Dozvole ovog foruma:
Ne možete odgovarati na teme u ovom forumu|
|
|